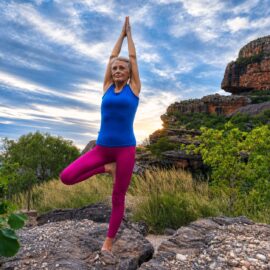
The “Queen Of Yoga Poses”
Shoulder Stand & Plough Pose Yoga Benefits.
How they work, & how to do them, including shoulder stand variations.
When I come down from a shoulder stand, or plough pose, I especially love the massive relaxation I feel. However, these two poses deliver you hugely more than just relaxation and de-stressing. Here’s how to do shoulder stand, & plough pose, plus benefits of shoulder stand pose, & more. There’s also many tips on shoulder stand yoga. Plus the best deals to start, or re-start yoga.
Shoulder stand (Salamba Sarvangasana) is an important asana (pose). In this tiny video of shoulder stand you’ll get a sense of why it is important. The video shows how to do it (with variations), as well as summarises some of the key benefits.
@flametreeyoga Shoulder stand, with variations, by Chris Lalor, of Flametree Yoga Studio
Mr BKS Iyengar wrote in “Light on Yoga” that “this asana strives for the harmony and happiness of the human system”.
He went on to say that it “is a panacea for most common ailments”. The benefits of shoulder stand pose are a key part of the many benefits of yoga.
Shoulder stand benefits are summarised below.
- It helps your hormonal system function properly. For instance, it’s because the chin lock produced in shoulder stand nourishes the thyroid and parathyroid glands in the throat.
- Turning yourself upside down helps blood flow to the heart. Most importantly, it can be done without strain. Blood flows to the chest, and circulates in the neck and chest. Therefore, it especially helps those who suffer from asthma, breathlessness, bronchitis, and other throat ailments.
- The chin lock soothes the nerves. Further, it can help those who suffer from headaches.
- It is particularly helpful for those who suffer from hypertension, irritability and insomnia.
- The abdominal organs are massaged, helping with constipation.
- It helps with urinary disorders. Many women find it helps with menstrual disorders. It is also help women as they go through menopause.
- It helps with those suffering from piles and hernia, stomach ulcers and severe pain in the abdomen and colitis.
- It is a truly wonderful pose that when practised regularly brings back your energy.
- It gives you strength and leaves you feeling calm, confident and happy.
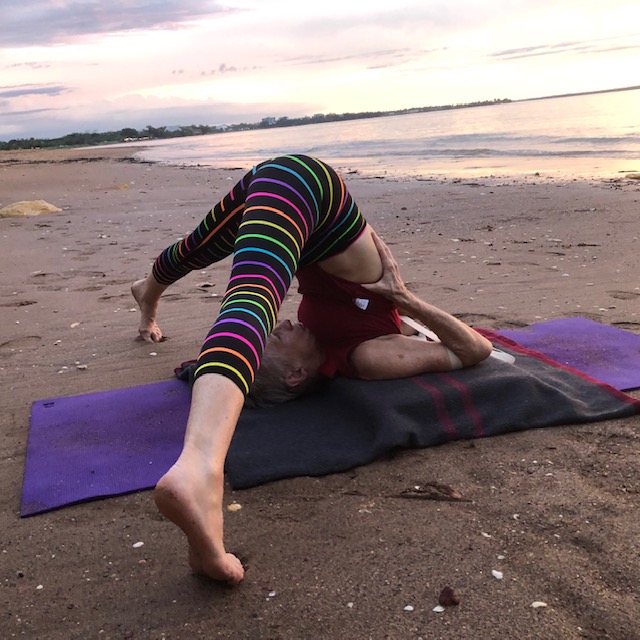
Regular or standard shoulder stand

A regular or standard shoulder stand, by me Chris Lalor, on the beach near Flametree Yoga Studio, Darwin Australia. Mr Iyengar called shoulder stand the “queen of poses.” With the extensive benefits of shoulder stand pose (above), you can see why.
Yoga Beginners Or Non-Beginners HALF price deals, online or in-studio
Most popular beginner & non-beginner deals, including 2 free weeks
Different variations in shoulder stand, including Niralamba Sarvangasana
Below, I have shown a few different variations of shoulder stand. The shoulder stand variation below is harder than the standard or regular Shoulder stand shown above.
This variation is done to help build additional strength in the neck and back muscles.
Shoulder stand variation with arms behind

Shoulder stand with a variation, with the arms out behind me. It’s harder!
Niralamba Sarvangasana
Shoulder stand without any support at all is called “Niralamba Sarvangasana”. It’s shown below, in two variations. I’m in my green tights.
It is more difficult than regular Shoulder stand, and the Shoulder stand variation above.
These two further variations of Niralamba Sarvangasana are for more experienced practitioners. Most importantly, you should only do it if you have no current neck issues.
Mr BKS Iyengar says that these variations “stimulate one like tonics”. I agree.
They tone the whole body, eliminating toxins. They also help a speedier recovery from periods of weakness.
Niralamba Sarvangasana variations of Shoulder stand

Niralamba Sarvangasana variation 1
Another Niralamba Sarvangasana variation is with the arms beside the trunk.
Both of these variations create an extreme (and delightful) chin lock… the great benefit of shoulder stand yoga.
In the process, you get an even greater amount o the benefits that flow from it.
Arms beside the body variation of Niralamba

Niralamba Sarvangasana variation 2
Shoulder stand with different leg variations
Below, I’m demonstrating different and additional shoulder stand leg variations.
At first you learn to lower one leg half way down, as I’m doing in the picture below.
At Flametree, you starting learning such variations in the levels after Beginner yoga.
The leg is lowered down in front of the face. Meanwhile, you keep your trunk lifted and both legs firm.
Learning shoulder stand yoga… bring one leg down

Shoulder stand leg half way down (Eka Pada Sarvangasana in Sanskrit)
As you become more experienced, stronger, and more flexible, you can take your leg lower.
Taking legs to the ground has even more benefits

Shoulder stand variation leg in front
Benefits of variations
As I have already indicated, the should stand variations give you even more benefits.
For example, one leg down in front, as you can see in these two pictures, tones kidneys and leg muscles.
Furthermore, one leg to the side relieves constipation.
Get benefits like toning legs & kidney, plus relieving constipation

Shoulder stand with one leg to the side (Parsvaika Pada Sarvangasana). This version is learnt in stages. Turn the leg to the side, and take it half way down, without loosing the alignment of the upright leg. The upright leg should stay in line with your hips.
Build up the time you stay in shoulder stand
To reap the full benefits that come from shoulder stand try to build up the time you stay in the asana (pose).
Then add in leg variations. You’ll find it easier to stay in the pose when you focus on the variations.
Overall, you can stay 3 minutes, and up to 5 or 10 minutes.
Supported shoulder stand over a chair can also be done as part of a restorative yoga practise, or when feeling low in energy.
In turn, it will help restore your energy and bring back a quiet peaceful state of mind.
Supported shoulder stand when low in energy, or with injury

Supported Shoulderstand can be practiced when feeling low in energy, or if you have a neck or should issue where the full pose is too strong, or as part of a restorative yoga practise.
Yoga Beginners Or Non-Beginners HALF price deals, online or in-studio
Most popular beginner & non-beginner deals, including 2 free weeks
Avoid inversions when menstruating
Women should avoid Shoulder stand when menstruating.
I’ve written elsewhere about this on the Flametree blog. Essentially, its about not interfering with the impact of gravity, and also avoiding any pooling.
Practise inversions up until when bleeding starts, then start it again after menstruating.
Instead, do poses like Bridge pose over one of two bolsters, with feet to the wall.
Use Bridge pose when menstruating

Bridge pose. A good option when menstruating.
Beginner yoga steps towards shoulder stand
Shoulder stand should be practised after Headstand.
Beginners learn Shoulderstand before Headstand.
Beginners start to learn shoulderstand by first practising chair arch yoga pose. They then progress to using a wall (see below Shoulder stand prep).
Finally when able to lift the chest and back body up, a beginner can move away from the wall.
Beginner yoga preparatory steps to shoulder stand

Shoulder stand prep for a Beginner, using a wall. But start with the chair arch pose.
Plough Pose (Halasana)
This is part of the shoulder stand cycle. It is done after a shoulder stand.
At first most people take the feet to a chair or a wall. It’s more difficult to immediately take the feet to the floor.
Learning plough pose in steps

Plough pose preparation with feet up a wall
As you become stronger, more flexible and confident, you can take your feet lower down.
First, walk your feet down a wall

Plough pose taking feet lower down onto support
Finally you can move away from a wall, into a full plough pose. Notice the even tighter chin lock. It therefore delivers even more of those benefits I listed at the start of this post.
Full plough pose with very tight chin lock

Full plough pose, with feet to ground or floor.
There are also many different arm positions in Plough pose.
They help to lift and open up the back of the chest.
I have shown just two variations here.
Plough pose variation with arms stretched out

Plough pose. Arms out and fingers interlocked.
Another variation involves turn the palms out.
This variation helps people suffering from stiff shoulders and elbows.
With palms turned out, get more plough pose benefits

Plough pose palms turned away from the back.
Benefits of Plough Pose
Plough pose has all the benefits of shoulder stand. In addition, there are extra plough pose benefits, such as those below.
- Deeper rejuvenation of the abdominal organs due to their contraction.
- Extra supply of blood to the spine, due to the forward bend aspect of the pose.
- Helps relieve backache
- Helps those with stiff shoulders and elbows, arthritis in the back. Interlocking of fingers behind the back is especially good.
- Gripping of the stomach due to wind is relieved when you practise this pose.
Plough pose also prepares you for forward bends.
Most importantly, if you have high blood pressure, then do plough pose before shoulder stand.
Other variations of Plough pose
Here are two more variations of plough pose.
First, Legs wide Plough pose Supta Konasana, & Legs sideways Plough pose (Parsva Halasana)
This pose contracts the abdominal organs and tone the legs further.
Leg Wide Plough pose
Leg Wide Plough pose (Supta Konasana)
Benefits of Legs sideways Plough pose (Parsva Halasana)
This pose is shown immediately below, with me (Chris Lalor), in green tights. The benefits are:
- Makes the spine very elastic
- Aids elimination: great benefit for those suffering from chronic constipation.
It is a strong pose so take your time.
You can take legs to a chair then overtime take legs to a chair.
First take your legs to a yoga bolster

Leg side ways Plough pose (Parsva Halasana)
Ear to Knee Pose (Karnapidasana)
In this pose, at first, some people feel anxious with the deep chin lock, especially in Ear to knee pose.
If you experience this try with your legs higher on a chair.
It can take time to get used to the sensations that you will experience in the head, neck, throat.
Yoga Beginners Or Non-Beginners HALF price deals, online or in-studio
Most popular beginner & non-beginner deals, including 2 free weeks.
Start with the legs to a chair

Ear to Knee pose (Karnapidasana)
Benefits of Ear to Knee pose (Karnapidasana)
The benefits of Ear To Knee pose are:
- It is a very restful pose as it rests trunk, heart and legs. Its well worth working your way into this pose.
- The Ear to Knee pose stretches your spine more than all other plough pose variations, and helps circulation of blood around the waist.
- Helps relieve tension around the neck, and back.
- Calms the mind and helps draw the mind deeply inward.
Side ways Ear to Knee Pose (Parsva Parnapidasana)
This is a deeper variation that is for more experienced practitioners, so take you time.
Use a chair, or take legs down to a bolster, before attempting to takes legs to the floor.
Work slowly into this variation

Side ways Ear to Knee pose (Parsva Karnapidasana)
Benefits of Sideways Ear to Knee pose (Parsva Karnapidasana)
The benefits of Sideways Ear To Knee pose are:
- Stretches the spine
- Deep internal massage of abdominal organs
- Intense stretch of the hips.
- Opens and stretches shoulders, upper back, middle back and neck.
- Rests trunk, heart, & legs
- Alleviates fatigue, helps with stress and insomnia.
Student testimonials on shoulder stand yoga, & much more
For more on the benefits of the above poses, see the Flametree student reviews. Read what the customers say about the benefits and experiences they get from yoga.
On the Flametree Facebook Page, you’ll find detailed posts from many students about the very wide range of benefits they received.
On the Facebook Page, or Flametree’s blog, or both, there are also many extensive stories by Flametree teachers and students, of the many benefit they have received from yoga.
For instance, here’s are testimonial stories by Belinda, by Stuart, by Gary, and by Miriam.
Chair arch is taught to beginners… to start shoulder stand

Chair arch is a good way for beginners to start learning shoulder stand. There are several experienced and popular teachers at Flametree Yoga.
Flametree Yoga timetables, and class types
Class times for beginners and non-beginners.
The beginner classes are all standard, introductory hatha yoga poses, in the Iyengar yoga style.
There’s also options, including Gentle Yoga, Yoga for Back (& Neck & Shoulders), Women’s Wellness (Non-Beginner) yoga, and Easy Restorative Yoga.
At the non-beginner level, there’s extra options like Yoga For Immune System, Fifty Plus Yoga, and more advanced levels.
If you’ve already done some yoga, you can also get excellent breath meditation (pranayama) classes and deals.
Beginner yoga packages
A Flame Tree Beginner level yoga class can be started at any time.
There’s also newcomer and lapsed HALF price ten pack packages (with 2 free classes if you pay by e-commerce).
But, once you’ve used an introductory deal like the half price packages, the cheapest way to do beginner yoga is with a ten class pass, or the pay-by-the-week deals.
The pay-by-the-week deals include the two weeks free. Passes can be paused on cancelled at any time.
For instance, follow the relevant links to learn more about the most popular of Flametree’s pay-by-the-week beginner yoga deals.
There is also a beginner course level that you can start anytime, in-studio or online. You are steadily taught new things at every class.
Ongoing Beginner Yoga Level: another fast start option
So, the ongoing beginner level is another fast way to get started with beginner yoga.
In the process, you’ll learn preparatory pose that will start to get you plough pose benefits, as well as the benefits of shoulder stand pose, and much more.
You can start anytime, online or three different locations in Darwin, Australia.
Depending on your skills and situation, you’ll be set up to attend an appropriate mix of the Special Focus classes, regular ongoing beginner classes, and the Mixed Non-Beginner level classes.
Some students also start with a private class or two, and then move onto regular online or in-studio classes.
Use any of these top deals to get more plough pose benefits
Yoga Beginners Or Non-Beginners HALF price deals, online or in-studio
Non beginner deals: from 30 days for $14.95 (AUD), for online, unlimited class. 50 cents a day!
Flame Tree Yoga Studio private classes, online or in-studio
Facebook Page for Flametree