Mountain Pose (Tadasana): How To Stand Properly
Mountain pose: the short version
Stand up and feel where your weight is. Is it in your toes, your heels, or mostly on one hip? Mountain pose in yoga, called Tadasana (tah-DAH-sah-na), is the pose where you learn to stand evenly on both feet, so that your spine can lift up from the pelvis towards the head. It is the first pose most students learn, and the base for almost every other standing pose. Done well, tadasana mountain pose feels solid, steady and calm.
This note in short form
- What it is: standing tall and evenly, with the feet facing forward.
- Feet: spread the toes and press evenly through both heels and the balls of both feet.
- Legs: lift the front of the thighs gently, and let the buttocks lengthen down.
- Spine: lengthen up through the top of the head, with the back broad and open.
- Props: a wall, a belt or a chair help you hold the shape with better alignment.
- Next step: learn it in class, in the studio or LIVE online. Your first class is free if you’re new.
Back to our Back Care notes.
What is mountain pose?
Mountain pose is a standing pose that teaches you to feel earthed and solid. As the name suggests, you stand like a mountain: the weight travels evenly down through both feet, so the whole spine can extend up from the pelvis towards the head. Its Sanskrit name is Tadasana.
Iyengar yoga is the style developed by Mr BKS Iyengar. In the 20th century he did more than anyone to set down traditional Indian yoga, through his books and his teaching, and he pioneered the use of props. It is sometimes called modern classical yoga, and it’s the style we teach at Flametree. In Iyengar yoga we pay a lot of attention to posture, and Tadasana is a key pose. Chris Lalor says it lets students feel steady, calm and emotionally settled, and able to breathe with ease.
How do you stand in mountain pose?
Stand tall with your feet hip-width apart and facing forward, and keep a wall within reach. Then take these steps, which take about three minutes:
- Spread your toes. Press evenly through both heels and the balls of both feet.
- Lift the front of your thighs gently, and lengthen up through the top of your head.
- Stay for 10 slow breaths. Feel the floor pressing back up through your legs.
- Now shift your weight onto one foot for 5 breaths, with one hand on the wall. Swap sides.

Mountain Pose from the front: feet facing forward, weight even, arms by the sides.
Stop if anything hurts. If you have osteoporosis (thin, fragile bones), a recent fracture, or a balance problem, talk to your yoga teacher first. Our article on yoga for osteoporosis explains what to look for.
Why do the feet matter so much?
The feet set the whole pose, and in the Iyengar tradition they should face forward. When your feet turn out, your weight rocks back into the heels, and many people clench the buttocks and tighten the lower back. When your feet face forward, you stand evenly on what Geeta Iyengar called the “four corners” of the feet (the base of the big toe, the base of the little toe, and the inner and outer heel). That even stance gives a sense of balance and ease in the spine.
The same thought runs up the legs. When the alignment is right, the thighs roll slightly inward and the buttocks lengthen downward. This inward roll broadens the sacrum (the triangle-shaped bone at the back of the pelvis) and the lower back, and it can ease the compression that builds from habit or tight hips.
Where should your weight be?
Your weight should travel straight down through the heels and the balls of both feet, not collapse into one hip. Chris teaches that when the weight is thrown too far forward, it can affect your breathing, because of how the hip flexors (muscles at the front of the hip) work with the diaphragm. When the weight is thrown too far back and the tailbone tucks under, the buttocks clench, and that can go with lower back strain. Our note on whether to tuck your tailbone looks at that question in more detail.
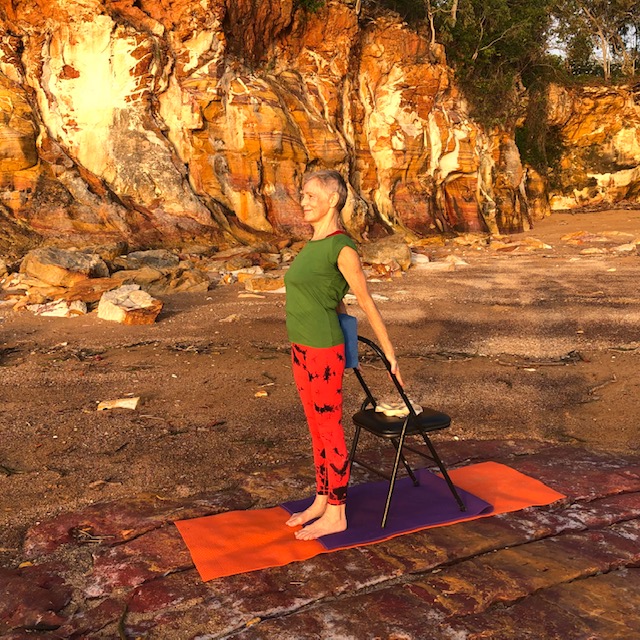
A chair beside you gives support while you learn where your weight is.
How do props help in mountain pose?
A wall, a belt or a chair lets you hold a shape for longer, and with better alignment, than you could on your own. A wall within reach steadies you while you learn the shape, and a chair beside you does the same. Props are how a body that has been still for years can start where it actually is. In an Iyengar class, the legs, hips and arms take weight in clear, precise shapes, held long enough for you to feel it.
You may have heard that bones get stronger where they are asked to work. Bone is living tissue that keeps rebuilding itself, and Victoria’s Better Health Channel says regular exercise helps reduce bone loss and conserve bone tissue. We do not claim that one pose builds bone. What we teach is how to stand so the bones line up and share the load evenly, which is a good foundation.
What if your back is stiff?
Use a wall or chair and make the pose smaller. You do not need to hold anything perfect. Stand with your feet facing forward, feel the weight even across both feet, and give your back time to broaden. Iyengar yoga uses props and mindful actions so you feel supported while you explore these principles. It is not about forcing the body. It is about noticing habits like clenching, slumping or favouring one side, and how awareness and alignment change the way you move. Chris says a practice like this can help a back feel stronger and more spacious over time. For research on back pain, see yoga for lower back pain: what the research says.
Learn mountain pose with a teacher
Your first class is free if you’re new to Flametree. New students, and anyone who has been away three months or more, can also get a half price 10 class pass with 2 extra classes free, to use online, in the studio, or both. We teach in the studio at Woolner in Darwin and LIVE online. For the studio, just come along. For an online class, click the class time you want and we email you the link to join.
See the half price pass or see the beginner timetable.
Already practising yoga? The same half price 10 class pass for new students, and for anyone away three months or more, is also available as the non-beginner half price pass.
Questions people ask about mountain pose
What is mountain pose in yoga?
Mountain pose, or Tadasana, is the basic standing pose in yoga, where you stand evenly on both feet and lengthen the spine up from the pelvis. It teaches you to feel earthed and solid. It is the base for almost every other standing pose.
How do you do mountain pose?
Stand with your feet hip-width apart and facing forward. Spread your toes, press evenly through both heels and the balls of both feet, lift the front of your thighs gently, and lengthen up through the top of your head. Stay for 10 slow breaths.
What are the four corners of the feet?
They are four points on each foot: the base of the big toe, the base of the little toe, and the inner and outer heel. Geeta Iyengar used the phrase to describe standing evenly. Pressing evenly through them helps the weight travel straight down through the feet.
Should the feet turn out in mountain pose?
In the Iyengar tradition the feet face forward. When the feet turn out, the weight rocks back into the heels, and many people clench the buttocks and tighten the lower back. Facing forward helps you stand evenly.
Why is Tadasana the first pose students learn?
Because every other standing pose is built on it. You learn to distribute your weight evenly through both feet so the whole spine can extend up from the pelvis. Chris says it also helps you feel steady and settled, and breathe with ease.
Is mountain pose safe with osteoporosis or balance problems?
Talk to your yoga teacher first if you have osteoporosis (thin, fragile bones), a recent fracture or a balance problem. A wall or chair within reach makes the pose steadier. Stop if anything hurts.
How long should you hold mountain pose?
A good starting point is 10 slow breaths, which takes about a minute. You can build to longer as it feels easier.
Where can I learn mountain pose in Darwin?
Flametree Yoga Studio teaches mountain pose in the studio at Woolner in Darwin and LIVE online. Your first class is free if you’re new to Flametree.
Flametree Yoga Studio, Darwin NT, teaching Iyengar yoga in the studio and LIVE online. This note is general information, not medical advice.
Sources
- Better Health Channel (State Government of Victoria, produced with Healthy Bones Australia). Osteoporosis and exercise. betterhealth.vic.gov.au
- Flametree teaching notes by Chris Lalor, Senior Iyengar Yoga Teacher, Flametree Yoga Studio.